Showing posts with label whole-grain. Show all posts

Sunday, March 31, 2013

Super Fudgy Steel-Cut Oats


Nutty + chocolatey +... healthy?  Yes!  Cocoa + coconut oil work so well with the steel cut oats here.

Steel cut oats have a wonderful nutty flavor and a satisfying crunch.  While I generally prefer them to the standard rolled variety, I would avoid them because they were too much work.  That is, until I realized I could make steel cut oats easily in my single serving rice cooker (stay tuned for some more details in a future post!).

To make these chocolate oats, you will need:

  • Plain oats of choice, cooked as you like them and warm (steel cut oats are wonderful!)
  • Unsweetened cocoa powder, to taste
  • Sweetener of choice, to taste (I used Splenda)
  • Coconut butter, a small dab for richness or to taste
  1. Mix everything together.
  2. Taste and adjust ingredients as necessary.
  3. Enjoy!


Saturday, May 26, 2012

Wild Rice Pilaf with Goldenberries


 Mmmmm...  Salty, tart and yet slightly sweet, chewy, wholesome, original, filling, and beautiful, this wild rice pilaf is truly a keeper recipe.  The addition of dry goldenberries to the dish makes it just that much more delicious and unique.  The goldenberries plump out while cooking but intensify in flavor, becoming sweeter and nicely complementing the savoriness of the rice.  The pilaf comes out tasting like you've spent hours slaving over a hot stove.  Who knew it could be so easy to prepare it?

To make the pilaf, you will need:
  • 1-1.5 cups of wild rice
  • 2 oz. or so of dried goldenberries
  • sweetener to taste (optional, I used one packet of stevia)
  • 1-2 cubes of vegetable bullion
  • 3-4 cups milk of choice (I used almond)
  1. Put everything into a small (1.5 qt) slow cooker.  Be sure the cooker is 2/3 full.  If you want to use a different size cooker, scale your ingredients accordingly.
  2. Cook on low until the wild rice achieves a desired level of doneness.
  3. Stir well.
  4. Enjoy!


Saturday, April 28, 2012

Coconut Quinoa Pudding

This is a healthy, creamy breakfast pudding, reminiscent of a rice pudding.  Unlike standard white rice pudding, this pudding is made from nutrient-rich quinoa, so comes with loads of protein and fiber.  The flavors are pretty comparable, and the texture is a little more creamy than standard rice pudding.  To make the pudding, you will need:

  • Quinoa of choice, uncooked (I used basic white quinoa)
  • Milk of choice (I used unsweetened almond)
  • Coconut flakes
  • Sweetener of choice (I used a mix of stevia and agave)
  • Ground ginger
  • Vanilla (optional)
  • 2-3 Green cardamom pods


  1. Fill small (1.5 quart) crockpot until 2/3 full with quinoa and milk, with approximately 1 part quinoa to 3 or 4 parts milk 
  2. Stir in remaining ingredients to taste
  3. Cook on low overnight or on medium or high heat for a few hours, until the pudding is soft and creamy.
  4. Taste and adjust seasonings; sprinkle with some extra coconut flakes.
  5. Enjoy!


Sunday, April 8, 2012

Creamy Cinnamon Sugar Breakfast Quinoa

This is one of the healthier, more filling breakfast meals I have had in a while.  Quinoa is a delicious seed that tastes a lot like a grain.  The consistency of this quinoa dish is much more like a porridge or oatmeal than a traditional quinoa.  Imagine wholesome, nutty quinoa, just more creamy than you might be used to, and mixed with cinnamon and sugar.  Yum!

Surprisingly, it's also one of the easier hot breakfasts to put together.  You will need:

  • Quinoa
  • Cinnamon, to taste
  • Sweetener of choice, to taste (I used stevia)
  • Salt to taste (a dash is usually enough)
  • Milk of choice (I used unsweeteend almond milk)
  • Fruit topping (optional, I used grapes)


  1. Inspect and rinse the quinoa (some boxes come pre-washed, and if so this step is unnecessary).
  2. Combine all ingredients in a small slow cooker (I used a 1.5 quart slow cooker).  You will want to use more milk/liquid for each serving of quinoa than recommended on box instructions, probably 1.5 to 2 times as much and possibly even more than that.  
  3. Cook on low overnight or until creamy.  Overcooking a bit is okay, just make sure that your cooker is sufficiently fully (2/3+) so that nothing gets burnt.
  4. Adjust seasoning.  Serve with sliced fruit, if desired.
  5. Enjoy!  It's yummy hot or cold.

I ate the entire portion, but it did make quite a lot, and I would imagine for those with smaller appetites or serving bowls it might serve two.  If you have any leftovers, this should keep for 2-3 days in the fridge, and tastes pretty good cold as well.


Saturday, April 7, 2012

Three Ingredient Quinoa Biscuits

These biscuits are delicious served warm and topped with coconut butter.
These biscuits are easy to make and quite good. They come out of the oven quickly and have a lovely golden color, a soft and crumbly texture, and a mild flavor.  Oh, and they happen to be pretty healthy too - each biscuit has approximately 130 calories!  You can make the biscuits in muffin tins (this was originally supposed to be a muffin recipe but the result was more biscuit like).  The biscuits require only three ingredients: quinoa flour, baking powder, and Sprite.  The Sprite works surprisingly well here - it has hints of citrus which make the biscuits taste a bit lighter than they might have otherwise, as they contain dense quinoa flour.  You can easily make a lower-calorie version if you substitute a sugar-free or diet soda for the Sprite.

You will need:

  • 3 cups of quinoa flour (you can make your own if you can't find it)
  • 2-3 spoonfuls of baking powder
  • Salt to taste (optional, recommended)
  • 12 oz of Sprite (I used one of the glass bottles where the soda is made with sugar rather than corn syrup.  Any lemon-lime or citrus flavored soda, including diet, would probably work well here)

  1. Preheat oven to 325 F.
  2. Mix the dry ingredients.
  3. Add Sprite and stir until blended.  You should get a pretty thick dough.  If you don't plan on serving topped with some melted butter or oil, you may want to mix some into the batter as well.
  4. Pour batter into 12 lined or greased muffin tins.
  5. Bake for 15-20 minutes, or until a tester comes out clean.
  6. Enjoy!  They taste even better the next day.  You can split a biscuit with a knife, then nuke the biscuit halves in the microwave for 20 seconds or until warm, and then spread with some coconut butter, or better yet a salted coconut butter!


This stack of biscuits was actually much more stable than it looked!


See the nice, crumbly golden tops?

Nice texture.  Yum!

Biscuit, unwrapped!


Really, the best way to serve them - with melted salty coconut butter on top!


Thursday, March 29, 2012

Bittersweet Banana Muffins

 This is banana bread in a muffin, suitable for snack time and much less sweet than than a standard banana bread.  And really, bananas are sweet enough, don't you think?  Banana breads needn't have so much added sweetness to taste delicious.  Breads for dinner and snacks can have less sugar and still have delectable taste.  I liked this variant on bananas in baked goods.  If you want a sweeter and more moist muffin, however, you can try adding some extra mashed banana or sugar to taste.

You will need:
  • 1 ripe banana, mashed
  • 3 cups of oat flour
  • 1-3 tablespoons of baking powder
  • 1 bottle of mild-flavor beer (for a gf muffin, you can use gf beer)
  • cinnamon and sweetener to taste
  1. Preheat oven to 350 F.
  2. Mash the banana.
  3. Fluff the oat flour with a spoon, along with the baking powder.
  4. Mix together the banana mash and flour mixtures, along with the beer.  Stir until the clumps of flour get dissolved.
  5. Add cinnamon and sweetener to taste.
  6. Pour batter into lined or greased muffin tins.
  7. Bake for ~20 minutes, or until tester comes out clean.
  8. Enjoy!
Makes 12 standard size (whole grain, gluten-free, vegan, 100 calorie) muffins.


Saturday, March 17, 2012

Hot and Creamy Cinnamon Breakfast Kasha

I've had this delicious kasha every day for breakfast this week.  It's wonderfully creamy and satisfying and so, so easy to make.  I am now on my way to buy another box so I can make more and more and more of it this week.  The directions are on the box for the basic mixture-I recommend adding cinnamon and a good pinch of salt as well as a drop or two of vanilla - to really bring out the flavors.  I think almond milk is just perfect here too, resulting in a breakfast pudding far more decadent in taste than regular old oats!

You will need:
  • Kasha (roasted buckwheat)
  • Milk of choice (I used Silk unsweetened almond)
  • Cinnamon, sweetener, vanilla, and salt (salt is important here)
  • Fruit for garnish (optional)
  1. Mix kasha and milk in a large bowl in approximately a ratio of 1 part kasha to 4 parts milk (or follow the box instructions)
  2. Add the remaining spices to taste.
  3. Microwave on high for 5 minutes.  Watch closely-you don't want the kasha to overflow and create a mess.  If the kasha seems to be rising to high in the bowl, stop the microwave and stir everthing, or transfer the mixture to a larger bowl.
  4. Let sit one minute, then stir.
  5. Enjoy!


Friday, March 16, 2012

Green Cheeze Balls

They're cute, aren't they?
 These balls are weird.  They have no dairy butter, or animal ingredients whatsoever.  Everything in them is pretty much raw and unprocessed.  And yet... they taste distinctively cheesy.  They're loaded with protein, and a decent amount of fiber.  The fat in these balls is of the healthy, omega 3 variety...  So these cheeze balls are much healthier than regular old cheese balls.  However, at this point the flavor combination I'm giving you is a proof of concept - a proof that yes, a vegan, cheesey, easy to roll ball is possible.  And it should be very, very possible to easily make it, and to get it to taste good, and to fulfill all of your cheesy cravings.  But the exact makeup of the cheeze balls isn't there yet. 

I need some help getting things just right!  For whatever reason it is that you're avoiding cheese (or if, like me, you just enjoy the novelty of finding new combinations of ingredients to recreate some familiar flavors, with a twist), I hope this combination of ingredients inspires you to fiddle around in your kitchen.  Right now there is something kindof "off" about these cheese balls, but I'm not sure exactly what it is!  These cheese balls CAN be perfected.  And you, yes *you* can do it!  And when you get it to work, let me know! 

To start fiddling with the recipe, I recommend:
  • Medium ripe avocado
  • Lemon juice
  • Nutritional yeast flakes
  • Bran (I used rice bran)
  • Protein powder (I used brown rice protein powder)
  • Garlic, salt, and pepper
  1. Mash the avocado to a pulp.  
  2. Add some lemon juice.
  3. Add remaining dry ingredients in sufficient quantities to get things to a more doughy consistency, and stir until everything is blended (use more bran or protein powder depending on what sort of flavor/nutrient profile you want.  Rice bran and brown rice protein powder both lend a nice salty/savory consistency to your cheezy dough).  
  4. Taste and adjust the seasonings accordingly.
  5. Sprinkle with additional nutritional yeast flakes.
  6. Enjoy immediately, or chill in the fridge for a bit.


Thursday, March 15, 2012

Warm Spring Green Lentil Curry

Ahh, springtime.  We have a change to agreeable temperatures which are no longer cold but not yet hot.  Sweaters are nice, but coats are optional.  And a nice bowl of warm lentils just hits the spot.  Following is a take on the traditional Indian lentil dal.  It was good when I made it, and delicious two days later after the flavors had really melded in the fridge.  You can make this lentil dish with standard green lentils, which are available at pretty much any regular supermarket.  To make the dish, you will need:
  • 1-1.5 cups lentils
  • 4-5 cups of water (you want approximately 4 parts water for every 1 part lentils)
  • 1-2 teaspoons turmeric
  • 1 tablespoon cumin seeds
  • 1-3 teaspoons ambhar dal masala (get a small box of MDH brand from any Indian store for $1-2)
  • salt to taste
  • 1 tablespoon oil of choice (olive oil works well here)
  • cilantro, more salt, red pepper flakes, and lemon (optional, for garnish)
  1. Rinse and sort lentils.
  2. Place the lentils a small (1.5 quart) crockpot with the other ingredients.  Make sure that your crockpot is approximately 2/3 full - if you decide to use a bigger or smaller crock, adjust your quantities accordingly.
  3. Cook on low, medium, or high heat in the crock until lentils are soft and tasty.
  4. Garnish with additional spices if desired.
  5. Enjoy!


Wednesday, March 14, 2012

Cinnamon Raisin Celebration Muffins

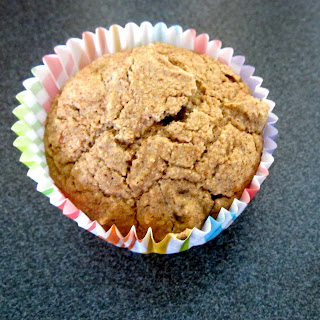
These muffins look especially festive wrapped in multicolor paper!
 These muffins are delicious, satisfying, easy, and healthy.  They are easily made gluten-free, and they clock in at about 100 calories/muffin and have almost no fat.  Each muffin is fairly generously proportioned, too, and while it may taste like a traditional muffin, it won't leave you with a sugar high followed by a sudden crash.  You may choose whether to use or omit the flaxseed - it won't affect the taste much but will make the muffin a bit less crumbly than it might be otherwise.  To make the muffins, you will need:
  • 3 cups oat flour
  • 1-3 tablespoons baking powder
  • 1 spoonful of ground flaxseed (optional, makes muffins less crumbly)
  • 1 bottle of beer (for gf muffins, use a gf beer)
  • salt, sweetener, and cinnamon to taste
  • vanilla (optional)
  • raisins to taste (I used 1.5 single serving boxes of Del Monte  raisins)
  1. Preheat oven to 350.
  2. Mix together the oat flour and baking powder (and the flaxseed, if desired); fluff with spoon.
  3. Add the beer, stir until all the clumps of oat flour get dissolved.
  4. Add the remaining ingredients, stir, and taste the batter.  Adjust the seasoning if necessary.
  5. Pour the batter into 12 lined or greased muffin tins and bake for approximately 20 minutes, or until a tester comes out clean.
  6. Enjoy!
Makes 12 muffins.
Right after they leave the oven, all ready to be eaten!

You can see a few of the raisins peeking through the surface.