Friday, March 30, 2012

Marvellous Microwave Spaghetti Squash

Craving a giant bowl of pasta without the carb-crash?   Spaghetti squash is a good alternative.  It's fast, easy and delicious, and it gets you that extra serving of vegetables each day.  The best part is that you can do all of the prep in your microwave and with a single plate - no need to heat up your house or your stove.  I would imagine this would also be a very kid-friendly, fun dish.

You will need:
  • Spaghetti squash
  • Salt, pepper, and garlic powder to taste
  • Olive oil (optional)
  1. Cut the spaghetti squash in half lengthwise.  If this is difficult to do, microwave the whole squash on high for 2 minutes or so and then cut it.
  2. Scoop out the seeds.  If you like, you can wash and bake them - they are edible and yummy!
  3. Take a de-seeded squash half and put it innards-facing-down on a microwave-safe plate.  Add some water to the plate, as the squash will dry up a bit in the microwave otherwise.
  4. Microwave the squash half on high for 5 minutes or until done (the amount of time this takes will vary from squash to squash and microwave to microwave).
  5. Use a fork to separate the squash innards into spaghetti-like strands.
  6. Add spices to taste and a small bit of olive oil, if desired.
  7. Enjoy!


This was a big squash, and the first few minutes in the microwave weren't enough - everything was really clumpy.


After a second round in the microwave, everything was just right.


Thursday, March 29, 2012

Bittersweet Banana Muffins

 This is banana bread in a muffin, suitable for snack time and much less sweet than than a standard banana bread.  And really, bananas are sweet enough, don't you think?  Banana breads needn't have so much added sweetness to taste delicious.  Breads for dinner and snacks can have less sugar and still have delectable taste.  I liked this variant on bananas in baked goods.  If you want a sweeter and more moist muffin, however, you can try adding some extra mashed banana or sugar to taste.

You will need:
  • 1 ripe banana, mashed
  • 3 cups of oat flour
  • 1-3 tablespoons of baking powder
  • 1 bottle of mild-flavor beer (for a gf muffin, you can use gf beer)
  • cinnamon and sweetener to taste
  1. Preheat oven to 350 F.
  2. Mash the banana.
  3. Fluff the oat flour with a spoon, along with the baking powder.
  4. Mix together the banana mash and flour mixtures, along with the beer.  Stir until the clumps of flour get dissolved.
  5. Add cinnamon and sweetener to taste.
  6. Pour batter into lined or greased muffin tins.
  7. Bake for ~20 minutes, or until tester comes out clean.
  8. Enjoy!
Makes 12 standard size (whole grain, gluten-free, vegan, 100 calorie) muffins.


Wednesday, March 28, 2012

Grilled Garlic Chardonnay Asparagus

A recent green party had left me with a clump of asparagus, and I had an old, half-opened bottle of chardonnay in the fridge, and thus this recipe was born.  I don't have much asparagus tasting experience-usually the vegetable frightens me-but I was determined to cook it, and white wine and garlic does tend to be a winning combination.  This recipe was pretty good, and I might even venture that I enjoyed a few full servings of the once feared vegetable in one sitting.  The asparagus is easy to prepare and makes good use of a dormant George Foreman Grill.

To make this you will need:
  • Bunch of green asparagus (if you try yellow here and it works, sound off in the comments!)
  • White wine (I used chardonnay)
  • Garlic cloves
  • Red pepper flakes
  • Sea salt
  • Pepper
  • Sweetener (optional)
  1. Snap the ends off of the asparagus and put them in a ziploc bag or a tray to marinate in white wine.  Throw in a few garlic cloves and red pepper flakes.  If you would like, you can also add some olive oil to the marinade.
  2. Let the asparagus marinate in the refrigerator for a few hours or overnight.
  3. Heat up a small kitchen grill (such as a George Foreman Grill) and cook your asparagus until cooked through.  This took a few minutes on my grill - watch carefully and cook to desired doneness.
  4. Add salt and pepper liberally and taste.  The salt and pepper really bring out the flavors here.  You may also want to try adding some sweetener to the finished project for a sweet-salty combination.
  5. Enjoy!


There's a lot of steam coming off of these vegetables - I tried to capture it in the photos, but in general the steam just made everything look blurry...

These asparagus had thick, woody stems even after snapping them and cooking the "good" parts.  The whole piece, however, was still quite tasty.


Sunday, March 18, 2012

Yellow Split Pea Soup

 I usually make this soup with green split peas, but I had a bag of yellow split peas in the cupboard and decided to give them a whirl in the slow cooker.  The result was an easy and delicious soup, with a beautiful color palette, suitable for spring.

To make the soup, you will need:

  • Yellow split peas
  • Salt, garlic powder, and red pepper flakes to taste


  1. Rinse and sort the split peas.
  2. Add peas and water to a slow cooker with approximately 1 part peas to 3 or 4 parts water, so that the cooker is ~3/4 full.
  3. Cook on low, medium, or high heat until the peas are fully cooked and soft.
  4. Stir in salt, garlic, and red pepper to taste.
  5. Enjoy!


Saturday, March 17, 2012

Hot and Creamy Cinnamon Breakfast Kasha

I've had this delicious kasha every day for breakfast this week.  It's wonderfully creamy and satisfying and so, so easy to make.  I am now on my way to buy another box so I can make more and more and more of it this week.  The directions are on the box for the basic mixture-I recommend adding cinnamon and a good pinch of salt as well as a drop or two of vanilla - to really bring out the flavors.  I think almond milk is just perfect here too, resulting in a breakfast pudding far more decadent in taste than regular old oats!

You will need:
  • Kasha (roasted buckwheat)
  • Milk of choice (I used Silk unsweetened almond)
  • Cinnamon, sweetener, vanilla, and salt (salt is important here)
  • Fruit for garnish (optional)
  1. Mix kasha and milk in a large bowl in approximately a ratio of 1 part kasha to 4 parts milk (or follow the box instructions)
  2. Add the remaining spices to taste.
  3. Microwave on high for 5 minutes.  Watch closely-you don't want the kasha to overflow and create a mess.  If the kasha seems to be rising to high in the bowl, stop the microwave and stir everthing, or transfer the mixture to a larger bowl.
  4. Let sit one minute, then stir.
  5. Enjoy!


Friday, March 16, 2012

Green Cheeze Balls

They're cute, aren't they?
 These balls are weird.  They have no dairy butter, or animal ingredients whatsoever.  Everything in them is pretty much raw and unprocessed.  And yet... they taste distinctively cheesy.  They're loaded with protein, and a decent amount of fiber.  The fat in these balls is of the healthy, omega 3 variety...  So these cheeze balls are much healthier than regular old cheese balls.  However, at this point the flavor combination I'm giving you is a proof of concept - a proof that yes, a vegan, cheesey, easy to roll ball is possible.  And it should be very, very possible to easily make it, and to get it to taste good, and to fulfill all of your cheesy cravings.  But the exact makeup of the cheeze balls isn't there yet. 

I need some help getting things just right!  For whatever reason it is that you're avoiding cheese (or if, like me, you just enjoy the novelty of finding new combinations of ingredients to recreate some familiar flavors, with a twist), I hope this combination of ingredients inspires you to fiddle around in your kitchen.  Right now there is something kindof "off" about these cheese balls, but I'm not sure exactly what it is!  These cheese balls CAN be perfected.  And you, yes *you* can do it!  And when you get it to work, let me know! 

To start fiddling with the recipe, I recommend:
  • Medium ripe avocado
  • Lemon juice
  • Nutritional yeast flakes
  • Bran (I used rice bran)
  • Protein powder (I used brown rice protein powder)
  • Garlic, salt, and pepper
  1. Mash the avocado to a pulp.  
  2. Add some lemon juice.
  3. Add remaining dry ingredients in sufficient quantities to get things to a more doughy consistency, and stir until everything is blended (use more bran or protein powder depending on what sort of flavor/nutrient profile you want.  Rice bran and brown rice protein powder both lend a nice salty/savory consistency to your cheezy dough).  
  4. Taste and adjust the seasonings accordingly.
  5. Sprinkle with additional nutritional yeast flakes.
  6. Enjoy immediately, or chill in the fridge for a bit.


Thursday, March 15, 2012

Warm Spring Green Lentil Curry

Ahh, springtime.  We have a change to agreeable temperatures which are no longer cold but not yet hot.  Sweaters are nice, but coats are optional.  And a nice bowl of warm lentils just hits the spot.  Following is a take on the traditional Indian lentil dal.  It was good when I made it, and delicious two days later after the flavors had really melded in the fridge.  You can make this lentil dish with standard green lentils, which are available at pretty much any regular supermarket.  To make the dish, you will need:
  • 1-1.5 cups lentils
  • 4-5 cups of water (you want approximately 4 parts water for every 1 part lentils)
  • 1-2 teaspoons turmeric
  • 1 tablespoon cumin seeds
  • 1-3 teaspoons ambhar dal masala (get a small box of MDH brand from any Indian store for $1-2)
  • salt to taste
  • 1 tablespoon oil of choice (olive oil works well here)
  • cilantro, more salt, red pepper flakes, and lemon (optional, for garnish)
  1. Rinse and sort lentils.
  2. Place the lentils a small (1.5 quart) crockpot with the other ingredients.  Make sure that your crockpot is approximately 2/3 full - if you decide to use a bigger or smaller crock, adjust your quantities accordingly.
  3. Cook on low, medium, or high heat in the crock until lentils are soft and tasty.
  4. Garnish with additional spices if desired.
  5. Enjoy!


Wednesday, March 14, 2012

Cinnamon Raisin Celebration Muffins

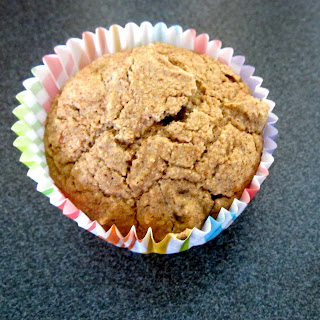
These muffins look especially festive wrapped in multicolor paper!
 These muffins are delicious, satisfying, easy, and healthy.  They are easily made gluten-free, and they clock in at about 100 calories/muffin and have almost no fat.  Each muffin is fairly generously proportioned, too, and while it may taste like a traditional muffin, it won't leave you with a sugar high followed by a sudden crash.  You may choose whether to use or omit the flaxseed - it won't affect the taste much but will make the muffin a bit less crumbly than it might be otherwise.  To make the muffins, you will need:
  • 3 cups oat flour
  • 1-3 tablespoons baking powder
  • 1 spoonful of ground flaxseed (optional, makes muffins less crumbly)
  • 1 bottle of beer (for gf muffins, use a gf beer)
  • salt, sweetener, and cinnamon to taste
  • vanilla (optional)
  • raisins to taste (I used 1.5 single serving boxes of Del Monte  raisins)
  1. Preheat oven to 350.
  2. Mix together the oat flour and baking powder (and the flaxseed, if desired); fluff with spoon.
  3. Add the beer, stir until all the clumps of oat flour get dissolved.
  4. Add the remaining ingredients, stir, and taste the batter.  Adjust the seasoning if necessary.
  5. Pour the batter into 12 lined or greased muffin tins and bake for approximately 20 minutes, or until a tester comes out clean.
  6. Enjoy!
Makes 12 muffins.
Right after they leave the oven, all ready to be eaten!

You can see a few of the raisins peeking through the surface.


Tuesday, March 13, 2012

Orange Creamsicle Powerbar Balls

 These balls are the lovechild of an orange creamsicle and a protein power bar.  They also happen to be rich, creamy, coconutty, and vegan.  With the proper choice of jam, they are poteintially fiber rich as well as sugar free!  They're also super-easy to make.  No baking or waiting required-just mix, roll, and presto!  You have healthy creamsicle balls.  If you have been following this blog, you may recognize the following dough mix as the same as the one from our no-bake shortbread cookies.  This time just go a bit heavier on the marmalade and vanilla, and there's no need to refrigerate the balls first.

You will need:
  • Coconut butter
  • Protein powder (I used unsweetened soy; I haven't tried others here)
  • Orange marmalade (I used SF Polaner)
  • Vanilla extract
  1. Melt the coconut butter in the microwave.
  2. Add protein powder and orange marmalade and stir into the melted coconut butter.  Start with equal quantities of the three ingredients, and then keep adding protein powder until you get a thick dough.
  3. Add vanilla to taste.
  4. Roll into balls.
  5. Enjoy!